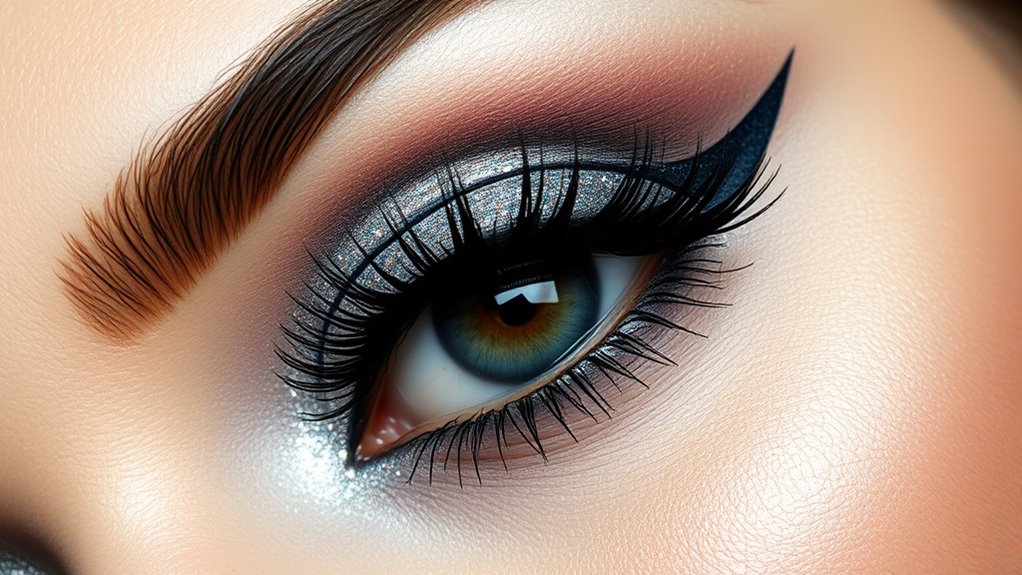
To create stunning glitter cut crease looks for evening events, start by prepping your eyelids with primer for smooth application. Define your crease sharply with concealer or tape, then layer a vibrant base color followed by seamless blending of *shift* shades. Apply glitter carefully using a brush or fingertip, adding adhesive for staying power. Finish with eyeliner, mascara, and false lashes for maximum impact. Keep practicing these steps, and you’ll discover how to achieve truly dramatic, eye-catching results.
Key Takeaways
- Prime eyelids thoroughly and carve out a sharp cut crease using concealer or lighter eyeshadow for a defined shape.
- Apply vibrant or contrasting base eyeshadows with seamless blending to enhance the dramatic effect.
- Use fine, cosmetic-grade glitter with a glitter adhesive for maximum sparkle and long-lasting wear.
- Focus on crisp eyeliner and voluminous lashes to frame the glittery eyes and elevate the look.
- Finish with setting spray and touch-up tools to ensure the glitter cut crease remains flawless all evening.
Choosing the Right Color Palette for a Glamorous Look
Selecting the right color palette is essential for achieving a glamorous glitter cut crease. You want color coordination that enhances your eye shape and complements your outfit. Start with a base shade that matches your skin tone or a neutral hue to create a seamless canvas. Incorporate vintage decor by choosing shades with a classic appeal, like champagne or rose gold, to add timeless elegance. When choosing shimmer selection, opt for shades that contrast well with your base, like deep browns, golds, or jewel tones, to make the glitter pop. Consider the overall look you want—warm tones add richness, while cool shades create a more dramatic effect. Keep in mind that bold, shimmering colors should be balanced with matte shades for definition. Additionally, selecting low light office plants with subtle shimmer-like qualities can add an extra touch of sophistication to your overall look. Understanding email marketing strategies and tools can help you refine your presentation and ensure your look stands out. Incorporating high-quality brushes can also enhance the precision and blending of your makeup application. To further elevate your style, exploring the latest beauty trends can provide inspiration for unique and innovative eye looks. By carefully selecting colors that harmonize and shimmer that stands out, you’ll craft a mesmerizing, sophisticated eye look perfect for evening events.
Preparing Your Eyelids for Flawless Application

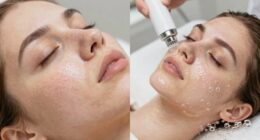
To achieve a flawless glitter cut crease, it’s essential to start by prepping your eyelids properly. Begin with good eyelid skincare—cleanse and moisturize to create a smooth canvas. Gently apply an eyeshadow primer to enhance pigment and longevity, ensuring your glitter stays put. Incorporate eyelid exercises into your routine to improve muscle tone and reduce puffiness, which helps achieve a more even surface. Avoid rubbing or tugging on the skin; instead, use light tapping motions. Make sure your eyelids are free of excess oil or grease, as these can cause creasing. Proper preparation boosts the adhesion of your eyeshadow and glitter, resulting in a sharper, more polished look. To further enhance the longevity of your eye makeup, consider skincare devices that improve skin firmness and texture around the eyes. Additionally, using primer formulated specifically for eyelids can help create a barrier that prevents creasing and enhances color payoff. Incorporating natural ingredients into your skincare routine can also help improve skin health and resilience around your eyes. Employing a comprehensive holistic care model that addresses social determinants of health can support overall skin health and vitality. With these steps, your eyelids will be perfectly primed for a stunning glitter cut crease.
Defining the Cut Crease for Sharp Precision

Achieving a sharp, well-defined cut crease starts with precise application of your eyeshadow base. Start by priming your eyelids thoroughly to create a smooth, even surface that enhances eyeshadow blending. Use a lightweight eyelid primer to neutralize discoloration and prevent creasing.
Once primed, apply a concealer or a matte eyeshadow that’s slightly lighter than your skin tone along the crease line. Use a small, flat brush to carve out the shape sharply, ensuring clean edges. To maintain precision, keep your hand steady and work slowly.
Blending the edges softly will help you achieve a seamless transition, but the core of defining the cut crease lies in careful eyeshadow blending and meticulous eyelid priming. This foundation sets the stage for a dramatic, polished look.
Applying the Base Eyeshadow and Transition Colors

Start by priming your eyelids to create a smooth, even base. Next, apply transition shades to help blend your colors seamlessly. To ensure your eyeshadows stay vibrant and true, consider using color-protecting products that can enhance longevity. Incorporating a base eyeshadow prior to applying your transition shades can further improve color payoff and adherence. Using a primer can also help minimize creasing and fading throughout the evening. Additionally, experimenting with different color combinations can elevate your eye makeup for evening events. Finally, blend everything together to guarantee a flawless, cohesive look. Remember, developing your blending skills is a form of creative practice that can enhance your overall makeup artistry.
Prime the Eyelids
Before applying any eyeshadow, preparing your eyelids to create a smooth, even surface is essential. Start by applying a thin layer of eyelid primer or eyeshadow base across your lids. This helps to enhance color payoff, prevent creasing, and extend the longevity of your makeup. Skincare Patches can also be used to protect sensitive areas around the eyes from potential irritation caused by makeup products. Use your fingertip or a small brush to evenly distribute the primer, focusing on the entire lid area. Let it set for a few seconds before moving on. This step guarantees your eyeshadow applies smoothly and stays vibrant throughout your evening event. Proper priming creates a protected, even surface that ensures your dramatic eye look remains flawless all night. With a well-prepped base, your eyeshadow colors will blend seamlessly, and your glitter cut crease will look flawless and dramatic. Proper priming is the foundation for a polished, professional eye makeup look****, helping your dramatic eye look last all night without smudging or fading.
Apply Transition Shades
Once your eyelids are primed and smooth, it’s time to lay down the base eyeshadow. Choose a transition shade that complements your overall look and applies it with a fluffy brush. Use gentle, windshield wiper motions to create a smooth gradient blending from your eyelid to your brow bone. Incorporating skin-enhancing ingredients like glycolic acid can help improve skin texture and ensure a flawless canvas for your eye makeup. This step is vital for a seamless color transition, helping your darker shades blend effortlessly later. Start with a light hue near your brow, then gradually deepen the color as you move toward the crease. Focus on soft, even strokes to avoid harsh lines. The goal is a subtle, harmonious gradient blending that sets the stage for more dramatic shades and highlights to come. Proper eyeshadow application techniques can also maximize the longevity and vibrancy of your look. Developing a good understanding of eyeshadow blending principles can significantly enhance your overall makeup results. This foundation guarantees a polished, professional finish for your glitter cut crease look.
Blend Seamlessly Together
To blend your base eyeshadow and shift shades seamlessly, use a clean, fluffy blending brush. Start by gently sweeping over the edges where colors meet to create a smooth transition. Before blending, guarantee your eyelid is primed for even application and longer wear; this helps colors stay vibrant. As you work, consider eyelash curling to open your eyes and improve overall look. Here’s how to do it: 1. Lightly tap your blending brush on the transition shades, blending in small circular motions. 2. Focus on softening harsh lines without over-blending, which can muddy the colors. 3. Check your progress in natural light, and add a touch more eyeshadow or eyelid primer if needed for a flawless result. Additionally, understanding AI-driven solutions in beauty technology can enhance your makeup routine with innovative tools and techniques. Incorporating such technological advancements can help you achieve more precise and professional-looking results with your eye makeup. Exploring color theory can also improve your ability to select and blend shades harmoniously for a striking evening look.
Creating the Cut Line With Concealer or Tape

Creating a sharp, clean cut line is essential for a flawless glitter cut crease, and using concealer or tape makes this step much easier.
Achieve a flawless glitter cut crease with sharp, clean lines using concealer or tape for a perfect finish.
Start by applying an eyelid primer to create a smooth base and prevent fallout.
Use an eyeshadow brush to precisely carve out the shape you want, blending the edges slightly for a sharp contrast.
If you prefer tape, place it along the crease line to catch any excess product and ensure a crisp edge.
For concealer, choose a shade slightly lighter than your skin tone, and carefully trace along the desired line with a small, flat brush or your finger.
This technique defines the cut line sharply, setting the stage for the glitter and ensuring your look stays neat and polished.
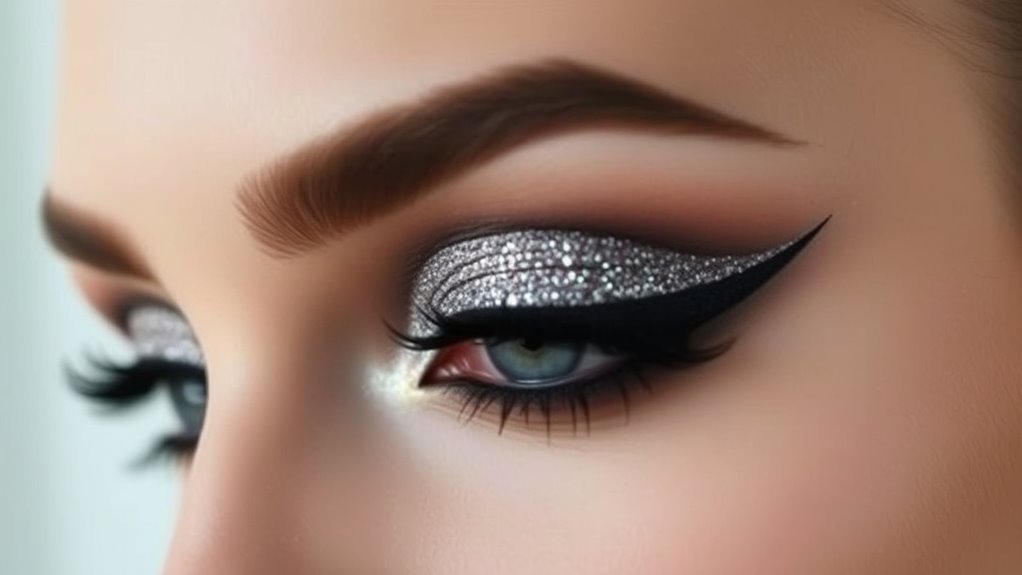
Adding the Glitter for Maximum Sparkle
To achieve maximum sparkle, selecting the right glitter is essential—opt for fine, cosmetic-grade formulas that stick well.
When applying, use a flat brush or fingertip to guarantee even coverage and avoid patchiness.
Finally, blend the edges carefully to create a seamless, dazzling effect that enhances your cut crease perfectly.
Choosing the Right Glitter
Ever wondered how to choose the perfect glitter to make your cut crease truly stand out? It all comes down to selecting the right glitter types and color coordination.
First, consider glitter types—loose, pressed, or chunky—based on the intensity you want. Loose glitters give a bold sparkle, while pressed ones are easier to handle.
Second, focus on color coordination; match the glitter shade to your outfit or eye makeup for a cohesive look. For example:
- Silver glitter for classic elegance
- Gold glitter for warmth and glamour
- Colorful or holographic glitter for a fun, vibrant touch
Choosing carefully ensures your eyes pop and your look stays harmonious throughout your evening event.
Applying for Even Shine
For an even, eye-catching shine, applying your glitter with precision and confidence is essential. Start by using a flat, dense brush or your fingertip to pick up small amounts of glitter. Dab gently onto the center of your eyelid, working outward to distribute the glitter evenly.
To guarantee maximum sparkle, avoid overloading your brush, which can lead to uneven application. For shine enhancement, consider using a glitter adhesive or a damp brush to help the glitter stick better and stay in place longer.
Tap lightly to press the glitter onto your eyelid, avoiding dragging or smudging. Take your time, checking for any patchy spots, and fill in gaps for a seamless, dazzling finish. The goal is a smooth, luminous shimmer that lasts all evening.
Blending Seamlessly
Once you’ve applied your glitter, blending seamlessly guarantees that the sparkle looks natural and cohesive. To achieve this, focus on your brush techniques and color theory. Start by using a clean, fluffy brush to softly blend the edges of the glitter, avoiding harsh lines.
Next, consider the color relationship: choose shades that complement each other to enhance the overall look. Finally, incorporate these steps:
- Use light, sweeping motions to blend the glitter into the crease for a seamless transition.
- Apply a slightly darker shade near the outer corner to add depth and dimension.
- Gently tap a small brush over the glittered area to diffuse any harsh edges and create a harmonious sparkle.
These tips ensure your glitter cut crease looks polished and radiant.
Blending and Refining the Edges

Blending and refining the edges is essential to achieving a seamless glitter cut crease. Use your brush techniques to softly blend the *shift* between the lid color and the crease, ensuring there are no harsh lines.
Apply light, circular motions with a clean blending brush to diffuse the edges. Incorporate color theory by choosing shades that complement each other, gradually *shifting* from darker to lighter tones.
Pay close attention to the gradient, blending outward to create a smooth, professional finish. Refine the edges along the brow bone and outer corner to enhance the shape and add depth.
The goal is to make the glitter pop without any abrupt borders, so take your time to blend meticulously for a flawless, dramatic look.
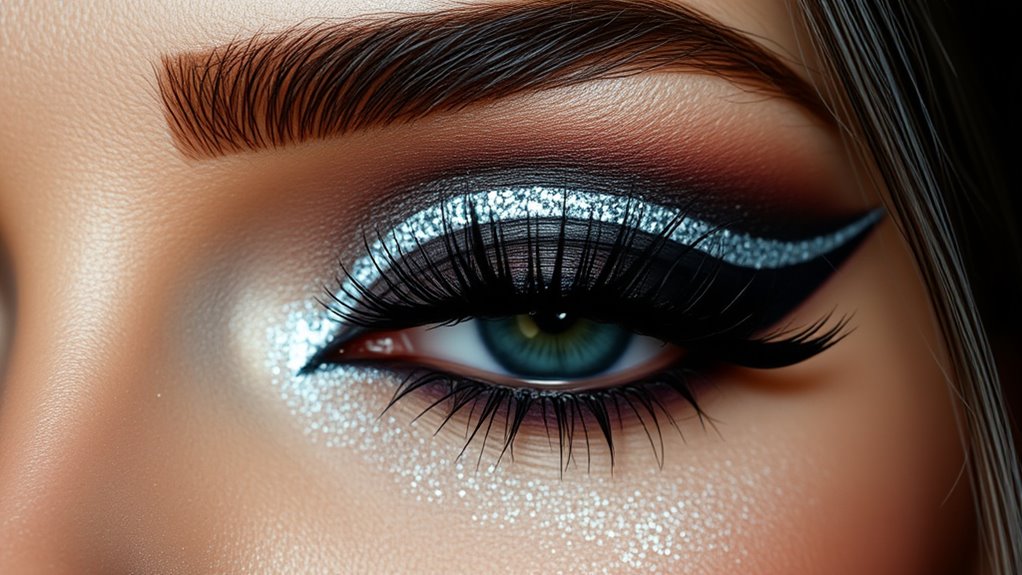
Finishing Touches: Eyeliner, Mascara, and False Lashes
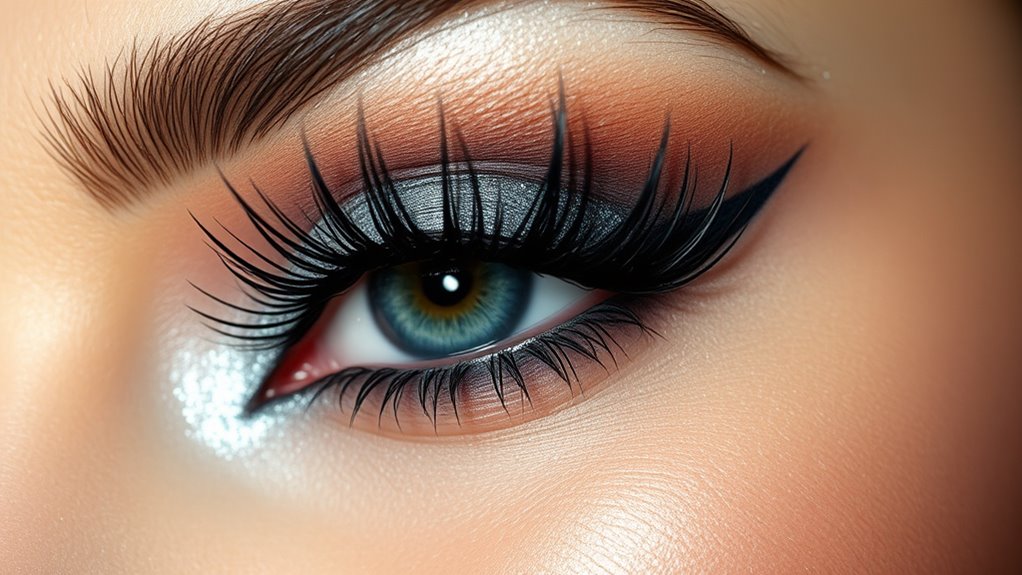
To complete your glitter cut crease look, focus on applying eyeliner, mascara, and false lashes with precision. Start by choosing an eyeliner style that complements your eye shape—winged, gel, or pencil—to define your eyes dramatically.
Enhance your glitter cut crease with precise eyeliner, mascara, and perfectly placed false lashes.
Next, enhance your lashes with mascara to add volume and length, making your eyes pop further. For false lashes, select a style that matches your desired intensity and use false lash techniques such as proper adhesive application and trimming for a perfect fit.
Here are some tips to perfect your finish:
- Use a steady hand for clean eyeliner lines.
- Apply mascara in zigzag motions for even coverage.
- Secure false lashes close to your lash line for a seamless look.
Tips for Long-Lasting and Smudge-Free Wear
Achieving a long-lasting, smudge-free glitter cut crease look requires careful preparation and strategic product choices. Start by applying an eyeshadow primer that grips well and prevents creasing.
Use color theory principles to select shades that complement your skin tone and enhance your eye shape, ensuring the glitter placement stands out.
When applying glitter, use a flat brush or your fingertip to press it onto a tacky base, avoiding sweeping motions that can cause fallout.
Seal the glitter with a thin layer of setting spray or a clear adhesive to lock it in place.
To prevent smudging, avoid touching your eyes and carry blotting papers for quick touch-ups.
With these tips, your dramatic eye look stays vibrant and flawless all night.
Frequently Asked Questions
How Do I Choose the Best Glitter Color for My Eye Color?
To choose the best glitter color for your eye color, focus on eye color matching and glitter shades selection.
If you have blue eyes, opt for warm golds or bronze to make your eyes pop.
For green eyes, try rich coppers or mauves.
Brown eyes look stunning with silver or purple shades.
Consider your overall look and event, but always pick glitter shades that enhance your eye color for a striking effect.
Can I Wear Glitter Cut Crease Makeup During Daytime Events?
Yes, you can wear a glitter cut crease during daytime events by keeping it subtle. Focus on a daytime glow with a soft, neutral eyeshadow base and add just a hint of subtle sparkle along your crease.
Use lighter glitter shades and avoid heavy application to prevent an overly dramatic look. This way, you achieve a polished, eye-catching style perfect for daytime, without going overboard for evening.
What Tools Are Essential for Precise Glitter Application?
Think of your tools like a knight’s armor—crucial for a flawless look. To precisely apply glitter, you need a quality brush set with small, detailed brushes and a good adhesive primer.
The brushes help you carve out sharp lines, while the primer guarantees the glitter stays put all night. Don’t forget to keep your tools clean for best results.
With these essentials, you’ll achieve a stunning, dramatic glitter cut crease effortlessly.
How Can I Remove Glitter Without Irritating My Skin?
To remove glitter without irritating your skin, use a gentle makeup remover or micellar water. Apply it with a cotton pad and let it sit for a few seconds to loosen the glitter.
Then, gently wipe away the glitter, avoiding harsh rubbing. You can also try tape or a soft brush to lift stubborn pieces.
Always follow up with a soothing moisturizer to prevent skin irritation.
Is This Look Suitable for Contact Lens Wearers?
Think of your eyes as a delicate garden needing careful tending. This look can be suitable for contact lens wearers if you prioritize contact lens safety and eye comfort tips.
Make certain your makeup is applied carefully, avoiding getting glitter directly on your lenses, and always wash your hands before touching your eyes.
Use hypoallergenic products, and remove your lenses before makeup application to keep your eyes comfortable and safe throughout the night.
Conclusion
With your glitter cut crease, you’re ready to steal the evening spotlight. Think of your eyes as a work of art, where every detail adds to its brilliance. As long as you blend carefully and set your look properly, your dazzling gaze will last all night, shimmering like a star in the night sky. Embrace your creativity and let your eyes be the ultimate statement piece that leaves everyone enchanted.