To instantly improve your makeup photos, position your ring light slightly above and directly in front of your face, keeping it at eye level or a little higher. This angle minimizes harsh shadows and highlights your features naturally. Experiment with the distance, typically 16-24 inches, and adjust the light’s angle for the best glow. More tips on perfecting your setup are just a step away, ensuring your makeup looks flawless every time.
Key Takeaways
- Position the ring light directly in front of your face at eye level for even, flattering illumination.
- Slightly elevate the ring light above eye level to soften shadows under the chin and nose.
- Keep the ring light centered and at a distance of 16-24 inches for balanced lighting coverage.
- Adjust the angle of the light to highlight features and reduce harsh shadows, experimenting for best results.
- Avoid placing the light too close to prevent glare; maintain proper distance for natural, professional-looking makeup.
Why Proper Lighting Matters for Flawless Makeup

Proper lighting is essential for achieving flawless makeup because it reveals your true skin tone and texture. When your lighting is consistent, you see an accurate reflection of how your makeup appears in natural conditions, preventing over-application or uneven blending. Color temperature plays a key role, as warmer tones can make your skin look softer, while cooler tones highlight fine details and color accuracy. If your lighting fluctuates or has inconsistent color temperatures, your makeup may look different under various lights, making it harder to create a seamless look. Ensuring steady lighting conditions helps you assess your makeup precisely, allowing for better blending, contouring, and color matching. Additionally, lighting setups like ring lights are popular for creating even, flattering illumination that minimizes shadows. Proper lighting also helps in color accuracy, ensuring your makeup matches your desired look in different environments. Maintaining a consistent lighting environment is crucial for assessing your makeup’s true appearance and achieving a professional finish. Using adjustable lighting options can further enhance lighting control, giving you the flexibility to optimize your setup for different makeup styles and skin tones. Considering the lighting quality can significantly impact how well you can see details and make precise adjustments, boosting your confidence by helping you achieve a flawless, natural finish every time.
How to Position Your Ring Light for the Most Flattering Illumination

Positioning your ring light correctly can make a significant difference in how your makeup looks on camera. To achieve the most flattering illumination, place the light at eye level or slightly above, facing directly toward you. This setup enhances your features and minimizes unwanted shadows. Proper light placement ensures even coverage and better shadow control, avoiding harsh lines that can distort your look. Keep the ring light centered in front of you and experiment with distance to find the sweet spot—usually 16-24 inches away. Adjusting the light angle can further refine how your makeup appears on camera, helping you achieve a flawless look. Understanding the lighting setup options available can also optimize your overall appearance and make your makeup pop. Additionally, understanding the storage and backup options available can help preserve your content and ensure your lighting setup remains effective over time.
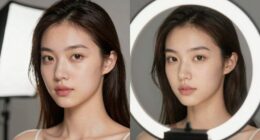
What Are the Best Ring Light Angles to Minimize Shadows and Highlight Features?

To minimize shadows and highlight your best features, angle your ring light slightly above and directly in front of your face. This setup ensures shadow reduction by evenly illuminating your facial features, preventing harsh lines that can distort facial symmetry. Positioning the light at this angle softens shadows under your chin and around your nose, creating a more balanced and natural look. Keep the light close enough so it wraps around your face, emphasizing your cheekbones and jawline without flattening your features. The goal is to achieve uniform lighting that enhances facial symmetry while minimizing unwanted shadows. Experiment with small adjustments, but always maintain the slight elevation for ideal shadow reduction and feature highlighting. Additionally, understanding lighting techniques can further help optimize your setup for the most flattering results. Incorporating urban pursuits in various regions can inspire diverse and engaging backgrounds for your makeup videos. Being aware of watt-hours and capacity considerations can also help you choose the right lighting equipment to ensure consistent illumination during your shoots. Considering auditory processing strategies might seem unrelated but can be useful when coordinating multiple audio and visual elements in your content creation. Recognizing lighting equipment specifications can also aid in selecting the optimal light for your needs.
How to Adjust Your Ring Light for Different Makeup Styles and Skin Tones

Adjusting your ring light for different makeup styles and skin tones requires paying attention to how the light interacts with your features. To complement diverse looks, tweak the color temperature—warmer tones enhance golden hues, while cooler tones suit neutral or fair skin. Light diffusion also matters; softer diffusion smooths out imperfections, ideal for natural or subtle makeup, whereas less diffusion adds sharpness for bold styles. Use this table to guide your adjustments:
| Makeup Style | Color Temperature | Light Diffusion |
|---|---|---|
| Natural/Everyday | Warm | Soft |
| Glamorous/High-Contrast | Cool | Moderate |
| Artistic/Creative | Adjustable | Varies |
Being mindful of lighting setup can significantly improve how your makeup appears on camera or in person. Additionally, understanding the effects of light quality can help you achieve the desired look more consistently. Paying attention to color rendering index (CRI) can ensure your skin tones appear natural under different lighting conditions, further enhancing your overall look. Recognizing how light color temperature impacts skin tone can also help you select the most flattering settings for your makeup style. Considering the light positioning is also crucial for achieving even illumination and avoiding unflattering shadows.
Common Mistakes When Setting Up Your Ring Light: And How to Fix Them

Many people make common mistakes when setting up their ring light, which can negatively impact the quality of their photos and videos. One mistake is incorrect light direction, causing harsh shadows or uneven illumination. Position your ring light directly in front of you or slightly above to achieve soft, even lighting that highlights your features. Another mistake is neglecting color temperature; using a light that’s too warm or too cool can distort your skin tone. Adjust the color temperature to match your environment or desired look—aim for a neutral or natural tone for makeup application. Additionally, avoid placing the light too close, which can cause glare and overexposure. Properly setting the light direction and color temperature guarantees your makeup looks flawless and your photos are well-lit. Paying attention to lighting setup can further improve your overall look and photo quality. Optimizing your lighting arrangement ensures consistent, professional-looking results every time.
Frequently Asked Questions
Can Ring Lights Be Used for Photography Beyond Makeup Tutorials?
Yes, you can definitely use ring lights for photography beyond makeup tutorials. They’re great for portrait photography, providing even, flattering light that reduces shadows and highlights your features. You can also use ring lights for product lighting, giving your items a professional, polished look. Just adjust the angle to suit your subject, and you’ll achieve beautiful, well-lit photos effortlessly. They’re versatile tools for a variety of photography styles.
What Is the Ideal Ring Light Size for Different Face Shapes?
The ideal ring light size depends on your face shape. For smaller or oval faces, a 12-inch ring light provides even, flattering illumination without overpowering your features. If you have a broader face or a square shape, go for a larger, 14-16 inch ring light to guarantee balanced light coverage. Adjust the height and angle to complement your face shape, creating a natural, well-lit look that highlights your best features.
How Does Ring Light Color Temperature Affect Makeup Appearance?
You’ll notice that the color temperature of your ring light considerably impacts your makeup’s appearance. A warmer temperature (around 2700K-3000K) enhances warm skin tones, giving a soft, natural glow. Cooler temperatures (around 5000K-6500K) create a crisp, bright look that suits cooler skin tones. Adjusting the color temperature helps you achieve the most flattering, true-to-life makeup look, depending on your skin tone and the vibe you want to create.
Are There Specific Ring Light Brands Recommended for Professional Use?
You might think all ring lights are the same, but for professional standards, brands like Neewer, Diva Ring Light, and Godox stand out. These brands are trusted by makeup artists and photographers because they offer consistent brightness, adjustable color temperatures, and durable build quality. Choosing a reputable brand guarantees your setup meets professional expectations, giving you reliable lighting that enhances your makeup artistry and creates flawless, studio-quality results every time.
How Do I Maintain Even Lighting With Multiple Ring Lights?
To maintain even lighting with multiple ring lights, focus on proper light diffusion and strategic light placement. Guarantee each light is positioned at an equal distance and angle from your face to avoid shadows. Use diffusers or softboxes to soften the light, preventing harsh spots. Adjust the brightness of each ring light so they match, creating a balanced, professional look. Regularly check and tweak the setup for consistent, even illumination.
Conclusion
Just like a master artist, your lighting choices shape the masterpiece that is your face. By mastering ring light angles and avoiding common pitfalls, you reveal your true radiance, transcending mere makeup into an act of self-expression. Remember, as with the delicate dance of shadows and highlights in a Caravaggio painting, your lighting setup can turn everyday beauty into something truly extraordinary—if you know how to position it just right.